A note about classification
The Systems Classification Hierarchy (SCH), that determines the system an asset belongs to, works in harmony with the Object Type Library (OTL) that defines the asset ontology. The OTL will have a relationship entity with the SCH in the AIMS database before asset creation.
Asset Registration
It is presumed that the following guidelines are for information only considering the objective of EWR in Digital Engineering is to register the assets in a fully automated procedure. This guide will present the manual process for classification creation along with the technical alternative utilising the ETL provision via CSV and XML as an alternative method that can be triggered manually or automated.
Creating a classification
The following procedure is a step by step process assuming the target audience has no knowledge of the system.
Logging In
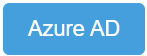
The login process is really simple as it utilises the Azure Active Directory.
- Step 1
- Navigate to the log in page
- Step 2
- Click the Azure AD button
Create a classification
- Step 3
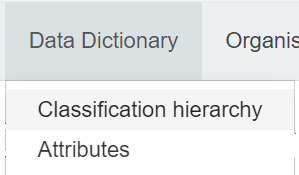
- Select the Classification hierachy menu item from the Data Dictionary menu at the top of the page
- Step 4
- To enable administrative tasks you must request defered rights. For this next step you will need AIMS Administrator. See Request Defered Rights
- Step 5
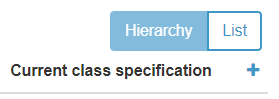
- Locate the plus (+) symbol above the header line and click it to enter the New Asset Class page
- Step 6
- Populate the required fields:
CODE - A reference code NAME - A classification name ASSET LEVEL - List of Values containing: Constituent - part of something Group - a collective or region Primary asset - a whole asset - Step 7
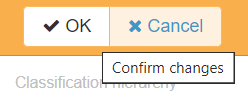
- Confirm the changes by selecting the OK button in the orange bar at the top of the page
- Step 8 - Optional
- Add a subclass by scrolling down the page until you see secondary classifications. Select the blue plus symbol to repeat the process above.